Tuesday, September 8, 2015

Taco Hash

I don't know about your family, but mine LOVES Mexican food.  Sometimes we get tired of regular tacos, and I often don't have the time after work for homemade enchiladas, etc. So, I found a new way to put together those tastes that they really love - Taco Hash!


It couldn't  be easier:

Ingredients:
1 bag frozen hash brown "crowns"
2lbs ground beef
2 packets taco seasoning
1 can diced tomatoes
1 can sliced black olives (optional)
1 sm can diced green chilies (optional)
1 bag (2C) shredded Mexican cheese
Shredded Lettuce
Sour Cream
Green Onions (chopped)


Directions:
Using large, rimmed baking sheet, cook crowns per package directions in a single layer.  As crowns are cooking, brown ground beef, drain and prepare per taco seasoning packet directions.  Open cans of vegetables and drain.  (For tomatoes you may want to strain/rinse them to get extra liquid out).

Remove crowns from oven but leave on baking sheet.  Take seasoned beef and distribute over the crowns.  Sprinkle entire sheet with olives, tomatoes, and chilies (or toppings you prefer).  Cover entire meal with the bag of shredded cheese.


Put back in hot oven for about 10 mins or until cheese is melted and bubbly.


Remove, cut into sections and plate.  Cover with lettuce, and top with sour cream and onions. Enjoy!


Thursday, March 19, 2015

Let's Talk About Nails Again - Specifically JAMBERRY!

Ok - so you guys know I did the full run on Shellac vs Axxium.  And the Shellac was generally great.  The upside was shiny, strong, non chip polish for weeks.  The down side was the cost of getting all the gear to do it at home, the cost of the polish, the limited number of colors, the time it took to remove them and the limited ability to do any kind of nail art.

Well.  this past October a friend threw an online Jamberry party.  I had heard the name bandied about but hadn't really paid much attention to it.  But I "attended" just as an act of support for my friend.  During the party the rep made these outrageous claims like:  These things will last 2+ weeks on fingers and 4+ weeks on toes; these things will not chip and fade; these things are made in the USA, non toxic, vegan, gluten free and cruelty free; these things have ZERO dry time and take about 15 mins to apply.    I was all "oh surrrrreee".   But I'm a bit of a sucker, so I tried some.  And I. was. hooked.  HOOKED.  Addicted.  Head over heels.  In love.  End of story.

So I did what any reasonable lady would do - I signed up as a consultant for the discount.  But once my friends started hearing about these things and seeing me with them on for weeks at time THEY wanted to know more and THEY were hooked.  So now I have a lovely little team of 7 gals, and have advanced through the ranks to Senior Lead Consultant with another promotion in view.  Crazy huh??  But I LOVE them.  And they do what they SAY they do!!!  And the team I work (my larger team) is an amazing group of kind and caring women.  Totally WIN WIN!

If you want to try them out let me know!  Or better yet, book your own Facebook party here and never leave your couch while earning FREE Jamberry because - FREE!  http://jamonkristi.jamberrynails.net/host/Schedule.aspx

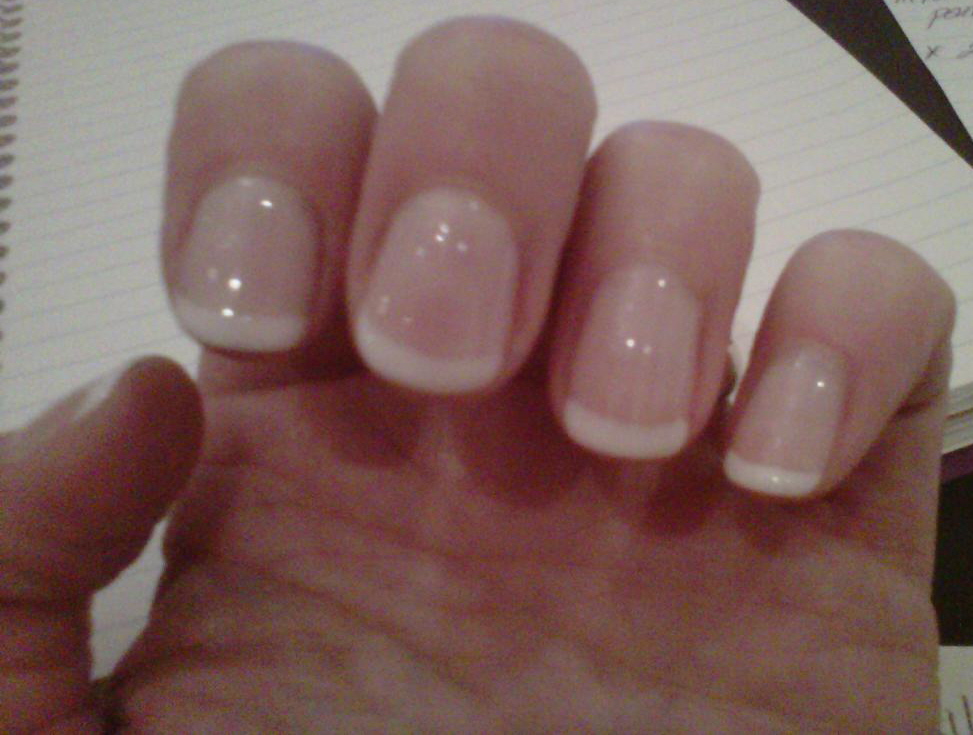
Here are a few of my recent "Jamicures" (and get ready to squeee - they make a "juniors" line for our littlest divas!!).  Find all of them here:  http://jamonkristi.jamberrynails.net/


Monday, March 17, 2014

Pinterest-worthy Double Bun

Yes, this is a selfie of my own hair - no fancy photogs here!
For weeks I've been trying out lots of Pinterest up-do's.  Some have turned out alright.  But most have apparently been of the misunderstanding that I have 4 hands, eyes in the back of my head and thick hair down to my rear (instead of the fine slick hair I have down to just past my shoulders).  So today I was playing around and inadvertently created my own updo.  I love the look of a "sock bun" but don't like having to wrap and pin all those ends.  I figured I'd share my eureka since, unlike many of the updo's found on Pinterest - it's not hard!

What you'll need:
A hair donut or sock bun form
2 hair elastics (I prefer silicone ones like these which you can find in many brands)
2 bobby pins
Comb
Hairspray

How to:

1) Put your hair into a pony in the high-middle of the back of your head  - secure with an elastic.

2) Create a bun using your hair donut or sock form - if you don't know how check out this good video tutorial (Hint; if you have your sock form or hair donut already, skip to 2:18 and then STOP after she uses the second elastic!):


3)  By now you have your bun with the second elastic holding it in place but with all your ends hanging out all over.   Gently gather all your ends at the top of the bun on top of your head, wrapping the ones from the bottom gently around and up so as not to disturb the bun.   Once you have them all at the top gently run a fine-toothed comb through them and gather them in one hand.  
4)  Take the ends and roll them under (toward your face) so that you now have a "tube" of hair - hold it there with the fingers from one hand.  Using the other hand insert a bobby pin into the bottom of the tube - one from each direction (left and right) securing the bobby pins to the "base" of your hair you pulled back for your pony.  Don't worry if the pins show right now.

5)  Once secured, gently take each end of the "hair tube" and slowly pull it down until the ends are flat to your head and you can't see any open space.  Smooth out the tube gently with your fingers and make sure hair is distributed evenly.  

6)  Spray away!   Voila, you're done!

Of course you can put the "tube" on the bottom, the side, wherever it suits you best!


Sunday, June 23, 2013

DIY Bollywood Bracelets

Recently I saw an ad on Facebook for "Bollywood Bracelets" selling for around $20 + a pop.  These bracelets were made of brightly colored fabric braided with a shiny notion of some sort.  I figured I could make them much more easily and cheaply.  I was right!  And I got everything I needed in one stop at my local big box craft store. Here's how:

What you need:


  • 1/4 yd fabric (you can use a cotton fat quarter like we did, or you could get some cool old shirts from your local thrift shop and cut them up!) You'll actually need way less, but fat quarters are handy.
  • 1/2 yd trim/notion string (if your wrists are small you could likely get by with 1/4 yd)
  • Ribbon crimp ends (ask for these at the store if you need help - I suggest med or large size)
  • Jump rings
  • Some sort of bracelet closure that can be attached via jump ring - we used magnetic closures
  • Hot glue gun w/glue
  • Needle nose pliers
  • Iron & ironing surface (I used a hand towel on top of my crafting table)
  • Liquid stich (optional)


Step One:
Cut your fabric into strips about an inch to an inch and a half wide depending on how wide you want your bangle when you end up - keep in mind we'll be folding these in thirds though.


Step Two:
With fabric face down on your ironing surface, fold one edge in to about the middle and iron it flat.  Fold the second edge in over that one, again ironing it flat.  Do this to both strips.  You'll thus end up with two little fabric "ribbons".  Below the one on the far left is what you'll see when you iron them.  The one in the middle is "face up".  This is where you can use your liquid stitch to seal them shut if you want to.  I don't mind mine fraying and looking a little rustic so I chose not to. (NOTE: if you're using old shirts make sure they are cotton or another ironable fabric.)


Step Three:
Safety pin your three bracelet sections together (strip of fabric, notion, strip of fabric).  Begin braiding them together keeping your tension relatively tight.


Step Four:
Once you reach your desired length (remember you'll be adding on about an inch of length with your clasp and findings) cut your remaining fabric/notion off while pinching the braid closed.  Take the ends and hot glue them together allowing the glue to cool before moving on to the next step.  Try not to hot glue your fingers.  You will - but try not to.   Remove safety pin and glue your starting end in the same manner.


Step Five:
Take one of your ribbon crimp ends and place it over one end of your bracelet using pliers to pry it open a bit if necessary.  Using pliers, crimp the end over the bracelet tightly, hopefully getting some of the cool-ish glue in there in the process.  Do this to the other end as well.


Step Six:
Using pliers, pull open two jump rings and place them through the loop on the end of the crimp end.  Before closing the jump ring, put one end of your clasp inside the jump ring, then using pliers, smoosh it closed.


All done!!  Look at you fancy pants!


Here are the ones I made with my girls today.  All of this stuff INCLUDING the glue gun and glue was under $50 (and could have been even less if we'd use cheaper notion strips)


Friday, April 15, 2011

Shellac v Axxium - Follow Up

Ok, so its been about six months since I first discovered Shellac and since my friend and I put Shellac and Axxium to the test.  How have they held up?   Allow me to show you my newly Shellac'ed nails in a lovely spring coral (and yes my cuticles are horrid - we'll get to why shortly):

As you can see I'm still happily Shellacing.  My friend on the other hand quit the Axxium product not too long after my original post.  She felt the process was too time consuming and was thinning out her nails pretty badly.

My biggest hurdle to get past was price.  While my salon was very reasonable with its prices, it was still about $50 each time after tax/tip.  That means $100 a month on my nails and that wasn't feasible long term.  So, luckily I had a birthday in December and asked for the whole Shellac shebang for a gift.  Awesomely enough I got it.  And I had actually tracked down a two-handed light which saved LOADS of time for do-it-yourselfers (otherwise not only did you have to do 2 mins per coat, per hand, you had to just sit and wait while one hand was under the light  "baking").   [NOTE! The light I got is NOT CND or Shellac approved.  However it works just damn fine thankyouverymuch.]    Here is my lovliness:

I did also get the appropriate level of alcohol (99%), the Shellac remover pads, and some Solar Oil (which I clearly have not been using - hello cuticles as mentioned).   So while I don't get the salon level results (as in there is usually polish on my fingers and at least one nail is filed at a wonky angle) its worth it to be able to keep up with a product I LOVE without having a second mortgage on our home.

Up next for me?  I want to try the new Shattered Polish by OPI but integrate it with my Shellac.  What I'm planning on doing is starting a normal Shellac French mani and then putting the Shattered just on the white tips.  After that I'll use the Shellac top coat as normal.  I'm hoping it works... we shall see!  But I think the possibilities are endless here and I'm excited to have the ability to keep at it!

Look for that Shattered post soon - just waiting for that little black bottle to show up on my doorstep.  (And no, I almost NEVER shop brick and mortar anymore thanks to Amazon Prime - but that's another post for another day!)

Wednesday, February 23, 2011

No Win Situation

My husband is a saint.  Seriously.  Those of you who have hung in there with me over the years would understand why!  I'm about to give you a shining, concrete example.

The other night as we were drifting off to sleep, I said aloud - without really giving it much thought - "you know I'm not sure I even have a proper suit anymore. I mean I have jackets and slacks but I doubt I have one suit set in my closet.  Humph".   I am lucky enough not to be required to wear suits daily at work and since I never see the inside of a courtroom any longer its just not high on my priority list.  When I go out in the evenings, a dress is my "go to".

Two days later as I am standing in my closet choosing what I might wear the next day, Hubby comes in and says "I've been thinking a lot about what you said - about not having a proper suit. It's really been bothering me.  When we get our tax returns, I want you to take $1000.00 of that and go on a shopping spree for clothes."  Ok, here is the point where any sane woman would jump up and down, squeal with glee, and throw herself at that wonderful man.  Any woman other than me.  You see, Hubby and I are trying to pay off ALL our debt.  ALL.  That means student loans, cars, mortgage, you name it.  We're attempting to set up and follow the ways of Dave Ramsey (a blog post for another day in and of itself).  So, I kindly told Hubby, "That is very sweet of you, but with us trying so hard to pay down debt, now is probably not a good time to go on a $1000 shopping spree."

At this point Hubby has GOT to be pretty confused.  I'm guessing that was not the reaction he was looking for.  (See instead: normal woman reaction).  So bless his heart he takes another tack.  He now says "Well I try really hard to keep my wardrobe current.  I buy at least one new piece each month.  I haven't seen you buy anything in months!  I want you to be able to stay up to date."   That is what he said.  What I heard was "My wardrobe is trendy and wonderful and yours is outdated and shabby.  So there."  Not good.

I may have gained some baby weight.  I have recently chopped off all my hair.  But by God the one thing I pride myself on is my fashion sense and wardrobe.  For me, its a source of PRIDE that I can cobble together anything out of my closet and make it look trendy.  I feel like I'm turning water into wine and all for the sake of my soon-to-be debt free family.  Sooooo Hubby's comments didn't sit well.  I did the only rational thing I could do: I burst into hysterical tears.  Poor Hubby just stood astonished and finally stammered out "I thought I was doing something good and yet you're crying!  I have no idea what I just did wrong!"

Little by little I was able to form complete coherent sentences and explain my thought process.  I think he finally "got it", but still didn't quite get it.    As for me, as much as I fantasize about that shopping spree I think I'll stick to my guns and work our savings plan instead.  Of course, the next time I want something - anything - I'm going to be reminding him at one point he offered me a $1000 shopping spree that I turned down.  Yeah.  He can't win.

Wednesday, January 12, 2011

Running on - Reebok?

I hate running.  Really.  I've tried in the past to love it but I never get that "runner's high".  Instead I get runners angst.  I end up cursing myself, my shoes, my legs, the pavement (or treadmill), the clock, etc etc etc.  However (you knew it was coming, right?) I've decided its the quickest, easiest, most portable cardio I can do.  I loved my Zumba classes but trying to get away from my desk at the same time each day is next to impossible.  So while I love the flexibility to work out during my work day classes weren't going to work long term.

Enter my friend Jenny.  You know the type - had her second child seven months ago and looks like she's never eaten a carb in her life?  Yeah.  Well she's a runner.  Each day I watch her go down and get her run in.  Each day I hear her mention how great she feels after.  This is about the time I'm eating a Mrs. Freshley's chocolate cupcake (heaven!).   So I've decided to join her.

The last pair of running shoes I have are about eight years old.  Really.  So its time for some new ones.  At least I can finagle some shopping out of this experiment in torture!  I decided, after much research, on a new pair of Reebok Runtones.  From all I can gather the "toning" part is iffy - but they rock as a running shoe.  I'll take that.  And our friends at Reebok allow you to customize EVERYTHING about the color palate of the shoe - down to the cross check and stitching!!  (Did you know the Rebook logo thingie was called a cross check - now ya do!)

Here are the ones I created - and here's hoping they make running fun palatable.
And just for fun, here are two that I created but didn't choose.  I think I could have a new career her folks.  Seriously.  Shoe-color-designer.  Catchy.

Monday, November 22, 2010

For the Birds

With Thanksgiving quickly approaching the gravity of my situation is hitting me.  What situation is that?  Well, two weeks shy of my 37th birthday I will be - for the first time - hosting Thanksgiving and preparing my first Turkey.  EEEEKS!

Of course, a month ago while planning I thought of all the wonderful things I would cook.  I would brine the Turkey via a 4-day process following Alton Brown's recipe.  I would make my grandmother's buttermilk rolls from scratch.  I would make maple glazed carrots with orange zest - a great new recipe I'd found.  I would make my famous sweet potato bake.  And I would  make Ree's (Pioneer Woman) pumpkin caramel gingersnap cheesecake.  My mom would be preparing and bringing  the stuffing, mashed potatoes, and pecan pie.  What a delightful menu!

However now that we're three days out many things have become very clear to me: 
  • I am not Alton Brown.  I don't even know what a whole allspice berry is and do not regularly use the word "truss" in everyday conversation.
  • I have never made a cheesecake in my life and my poor Kitchenaid is so dusty it may rebel against being asked to function
  • I have one oven.  One.  Turkeys take approximately 47 hours to cook.  How then will I be cooking a cheesecake for over an hour, rolls for 20 minutes, and sweet potato bake for 45 minutes - all at different temperatures - and have them all come out perfect just in time for dinner.  Did I mention no warming drawer?
  • I am insane.
So now that we have all that covered I'm forced to reevaluate.  Do I push forward and "go big or go home" for my veritable Thanksgiving debutante ball?  Or do I play it safe, take it down a notch (ok ten notches) and make sure I have at least something palatable to serve?  Well, I've never been much of a "play it safe" girl when it comes to the kitchen so I think I'll forge ahead.  (But I may have a precooked turkey breast tucked in the back of the fridge for emergency purposes!)

Saturday, October 30, 2010

Shellac & Axxium - Test Drive

When my friend Sarah sent me a text asking if I'd heard about the "CND manicure" I just thought "Urgh - no thanks.  No wasting my money on manicures that last about 1-2 days in mommy land."  While I love the pampering of a mani, I get so disappointed when, after shelling out $30, my polish chips the next day or, if I'm lucky, the day after.  For that reason alone I almost never polish my nails.  There is no polish that can stand up to baby baths, washing bottles, washing diapers, fixing dinner, washing dishes, etc etc day after day.  Or, excuse, me.. there wasn't.  Now, there is!

Enter CND's Shellac system and perhaps slightly more well known OPI's Axxium system.  After looking into this "CND manicure" I became more and more intrigued.  It claims to be a manicure that lasts  "14+" days.  *insert jaw drop here*  I was VERY skeptical.   I was guessing it didn't really last 14 days.  Or, if it did, it would be a major ordeal to remove including damaging the nail bed.  The more I read on CND's website, (http://www.cnd.com/Products/Color/shellac-hello.aspx) I noted they claim minimal removal time and NO damage to the nail.  Did I mention the ZERO dry time (no trying to fish for your keys like a wingless chicken after the mani).

While looking into CND (and doing my regular neurotic research) I came across a few other "14 day" manicures.  The most popular being by polish pro OPI.  They call theirs the "Axxium" system. http://www.opi.com/   In my reviews it seemed that Axxium was slightly more "durable" (i.e. you can actually paint OVER the color you got at the salon, and then remove it with nailpolish remover to see the original polish) however the down side was that reports said it took quite a bit more to remove (more time and more "doin'") and after repeated use might damage the natural nail.

In the name of fair research, my friend Sarah got the Axxium and I got the Shellac (what we won't do for the sake of science).  Below are photos of our progress and the eventual "re-do".   After the photos I'll give you the "low down" on what we both thought! [Note:  I don't have the first few days of Axxium - I pulled Sarah into my scheme a little late in the game, but you'll still get a complete picture of the durability)]

Day One, Shellac

Day Three, Shellac

Day Five, Axxium

Day Six, Shellac

Day Eight, Axxium

Day Nine, Axxium:  Post Pumpkin Carving

Day Ten, Shellac: Note Grow-out

Day Eleven, Axxium

Day Thirteen, Shellac

Day Fifteen, Axxium

Day Fifteen, Shellac (Yikes Grow-out!)


Wow.  Let me again say it:  WOW!   I was (and am) totally converted.  These manicures both did truly live up to exactly what they promised.  They were mirror shiny and "no chip new" the entire time until we both had them re-done.  They also are really and honestly dry the minute your top coat comes out from under the UV light.  And I mean "drag my keys across it" dry.   The down side is that if your nails grow lightening fast like mine do, you'll have some icky grow out to live with (or you'll have to have it done more often than every 2 weeks).   However if you look at Sarah's, the combo of the light colored French and her reasonable growth cycle shows almost no noticeable grow out.  

When it came time to have a re-do we both decided to stick with the company we'd started with (hence I stayed with Shellac and Sarah with Axxium).  When I asked Sarah about her removal process she said it took about 30-45 mins and involved the nail stylist coating her fingernails with acetone-soaked cotton, wrapping it in foil, and then heating it.  After that the nail stylist had to file some the remainder off.  [My guess is this is the point some nail techs can cause damage it they're not careful.]   For Shellac, CND makes these little "acetone soaker band aid thingies" that wrap around each fingernail and you let it sit for 10 mins.  Then, it literally flakes/crumbles off (my stylist used an orange stick to scrape it off).  The way my nail tech described it (who went to the official CND training) the acetone literally breaks down the bonds/structure of the gel polish so it flakes off.  No buffing. or filing was required prior to my re-do.  However for both our "re-dos" the whole process took about an hour and a half or slightly less.  So it sounds like a wash there.

Here are our respective new nail "dos":

New Axxium (Sarah decided to go all one color this time)

New Shellac.  Hey its Halloween Weekend!!


So - from what I have seen it sounds like Shellac may be slightly less durable than Axxium in theory (I say in theory since I sure didn't see any damage in my 15 days and while at the salon getting my re-do, a lady told me she kept hers on four weeks!).  In return, it sounds like Axxium has the potential for more damage to the nail than Shellac in theory (again I say in theory because Sarah experienced no problems and I presume it depends on the ability and experience/training of your stylist).  I would say whichever system you choose you will not be disappointed!

Now, what everyone wants to know:  Price.   Generally from my midwestern shopping around (Iowa, Kansas City, Chicago) both are comparable in price and tend to run from around $35 on the low end for an "express" version (which means no mani pampering - just the polish process) to over $50 on the high end (at more chi-chi salons and/or including more pampering).  The big key:  shop around in your town!!  The first place I had mine done would have charged me $10 to remove the polish IF I was getting the process redone and $14 if I just wanted it off.  I called around and found that right in my own backyard, my local salon would do the removal for FREE, IF you were having the process redone.  They did charge $10 if you just wanted it off and weren't having another service.  I figured that was more than fair.    NOTE:  Since these processes are becoming so popular so fast, not many salons have been able to get ahold of the process (many of the materials are on backorder from the companies).  CND has a "shellac salon locator" on their website.  For OPI you may have to just call around a bit.  Even in Des Moines I was able to find about eight salons that did Shellac.

Lastly:  I absolutely want to give a shout out Melissa at Shear Style Salon in Ankeny http://www.shearstylesalon.net/  where I had my re-do.  She fit me in on short notice, as I mentioned she did not charge for removal since I was having the process redone, she had this great new glitter technique I'd never seen before (the benefit of being CND trained), and she's just a really damn nice person!  I really enjoyed my time with her!   If you live in the Des Moines area and want to go Shellac - by all means give Melissa a call.  You'll be glad you did!  I know this will be my new Shellac home from now on.  

Wednesday, July 14, 2010

Cloth Diapering 101


Welcome to Cloth Diapering 101. 

Below you’ll find an FAQ.  There is much more to know – and I openly disclose I am a newbie – but this should be enough to get your toe in the water.  If you have any questions I haven’t answered, just ask away in the Comments section and I’ll be happy to respond!


Q:  How do Cloth Diapers (CDs) work?
A:  It depends on the type that you purchase.  I’ll go over a few of them below.

-          Pre-folds & Covers:  This is closest to the “diapers of old” that our mothers used but usually the most economical.  The “pre-fold” is the absorbent diaper portion that goes against the baby’s skin. You would need to attach it via diaper pins or new “snappies”.  The Cover is what goes over the prefold – usually some form of waterproof fabric with elastic/gusseted legs and waist.
-          All In Ones/AI2s:  These are where the inner absorbent portion and the outer waterproof cover are sewn together in one diaper.  They usually attach with Velcro-type (hook/loop) closures, or with snaps.  They are handy – especially for reluctant dads, grandparents, or daycares since they are used much like a disposable. (A subset of this category is AI2s, where part of the inner diaper is either not sewn in completely, or is removable. This is to aid in drying time)
-          Pocket Diapers:  These are similar to All In Ones, but instead of the inner portion being sewn in, you put “inserts” into a “pocket” inside the diaper.  The type of insert and its absorbency level depends on the brand you are using as well as personal preference.  (note: you still must change the entire diaper each time as the pee or poo will get on the outside of the “pocket”).  Some brands of pocket diapers offer biodegradable/flushable inserts.
-          Hybrid:  These are newer to the CD genre and are the only diaper you can “re-use” more than one time between cleaning.  The liners of the diaper snap in and out so that you can remove the soiled area, replace with a fresh liner and re-use the “shell”.  However, once the shell has gone through a few changings (2-3) or once your loved one has pooed on them, you do need to change the shell as well.

Q:  Do you have to replace the entire diaper every time?
A:  Unless you are using a “hybrid” diaper, you will need to replace the entire diaper each time. 

Q:  Do diapers come in “sizes”?
A:  Some do.  Some diapers come in various sizes (S, M, L, etc).  Some are “One Size” diapers.  The “One Size” diapers adjust via either snaps or elastic tabs to fit a wide range of sizes (usually around 8-30lbs).

Q:  Where do you keep soiled CDs until cleaning time?
A:   Again some of this depends on personal preference.  Most families simply keep either a diaper pail with a CD liner (different than a typical “disposable” pail liner) or have a special “hanging wet bag” they place over a doorknob.  These pail liners or wet bags are cloth and lined with waterproof material.  The bags are washable and the idea is to wash them at the same time you wash the corresponding load of CDs.  Portable wet bags can be used for being out on the go or for daycare providers. 

Q:  How often do you need to clean them?
A:  Most CD companies recommend cleaning every 1-2 days for best results.

Q:  What do I do with the “poo”?
A:  Again it depends.  Some moms use biodegradable liners (thin sheets that go between the baby and the diaper) to contain poo for easier disposal.  Most people will tell you that if you’re exclusively breast feeding, the poo doesn’t need to be rinsed prior to being placed in the washing machine.  For older infants or those formula fed (firmer or stickier poos), you can use a disposable wipe, you can use a sink sprayer, you can use a special diaper sprayer that attaches to your toilet, or you can dip the diaper into the toilet and flush. 

Q:  Do you need special detergent?
A:  It depends on what you mean by “special”.  You do need something that is safe for CDs (and for your little ones!).  Many moms like All Free & Clear.  It does still contain a chemical “brightener” but is a relatively safe choice.  There are also “niche” detergents like Rockin Green and Charlie’s. Here's a good link to help:  http://www.zany-zebra.com/diaper-detergent-chart.shtml

Q:  What do you do with the wipes you use?
A:  If you use disposable, you can usually just throw them in the wash right along with the CDs and then pick them out once washed to dispose of them.  Many moms use cloth wipes however.  I’ve even heard of moms taking the cloth wipes out of the washer and, while still damp, placing them in a wipes warmer!  What type of cloth wipe you like is a matter of preference, but many moms use either infant wash cloths, or cut up squares of microfleece.

Q:  How expensive is it to cloth diaper?
A:  It depends on what “system” you go with, how big a “stash” you want to have (i.e. how long you can go without doing laundry) and whether you use “fitted” or “one size” diapers.  From what I’ve seen, to get a solid “stash” expect to spend around $300 for all new.  However, there are great used diaper sites around as well as Craigslist and eBay.  Just remember that over the lifetime of your child, you’ll be saving hundreds in comparison to using disposables for 2-3 years.  Also, if you plan on having more than one child you will be able to use those CDs for future kids as well.

Q:  How many CDs will I need?
A:  Well if you just want to check out the CD world to see if you like it, you could get away with just a few diapers and/or covers.  However, if you know you want to jump in whole hog, you should have enough to change your baby for at least two full days.  Most would say that equates to about 18 diapers.  However if you’re using the Hybrids you may be able to get away with a few less.  The general rule there is to have enough shells for however many times your baby poops in a 2-day period (4-6). 

Q:  Are leaks worse with CDs?
A:  It depends on who you ask.  Some will say the “sized” diapers help better control leaks. Others will say specific brands work better for them than others.  Basically - just like disposables - it’s a matter of trial/error and brand preference.  Many diapers offer “soaker pads” or “doublers” which are pads of absorbent fabric you lay in the crotch area of the diaper to increase absorbency.   Some moms do prefer to use disposables for overnight protection, while others find that they are fine with cloth.

Q:  Is diaper rash worse with CDs?
A:  No. In fact many mothers find that they have less incidents of rash with CDs due to the lack of chemicals in the diaper.  Do note that most diaper rash creams cannot be used with CDs unless a liner is put in place.

Q:  I’m lost on all the lingo and abbreviations!
A:  Check here for help: 


Monday, July 12, 2010

Cover it in Cloth!

AIO.  Flip.  Hybrid.  Am I talking about cars?  Electronics?  Cameras?  Nope - I'm talking about diapers.  Cloth diapers to be specific.  We've decided (well I decided, my husband kindly acquiesced) to start using cloth diapers on our 3 month old.  I like being green and not clogging up landfills, but I also like the cost savings.  I figured up the average cost of diapers and wipes for two years and we will be saving about $600 by using cloth.  Our only hurdle will be getting day care on board - but I'm confident.  I think.

For those of you who are having thoughts of saggy white cotton or muslin, pins shaped like duckies and bunnies, and huge sloppy pails of Borax water - think again.  Cloth diapering is as much fun and fashion as it is function.  And, to be clear, the function part has greatly improved over days of old as well.  Allow  me to show you some of the new wave of cloth diapers (CDs):


So you can see how I was won over.  I get to be eco-conscious, thrifty, AND fun/fashionable.  What's not to love??

Speaking of love... I ordered most of my diapers from Nickis (http://www.nickisdiapers.com/).  Not only do they allow a 15-day trial period on all diapers (yes - they will let you return USED diapers if you don't love them as long as you follow their rules found here:  http://nickisdiapers.com/pages/15DayWash.php) but they have great shipping offers and fun free gifts with sizable purchases.  They also offer a HUGE variety of CDs and CD accessories (wet bags, detergents, liners, etc).  They can be limited in their inventory - I found that  many of my "wants" were either completely sold out, or the colors I wanted were not available.  I'm not sure if this is normal for the site but I do plan on checking back as I find the CD system I want to stick with.  I also used Diapers.com who have free shipping on orders over $49 and a referral program that is great ($10 off to each friend you refer along with a $10 credit to you!).  Their CD selection isn't outstanding but they have the big names and they have a TON of other mommy products from feeding to toys.

Here are the brands I'll be trying out in coming days:
Bumgenious Flip
Bumgenious organic AIO
Fuzzibuns OS
Knickernappies OS
GroVia (the new update of GroBaby)
Best Bottom Hook/Loop (Nicki's own brand)
Gdiapers

Be on the lookout soon for a CD "primer" for beginners.  I'll include a quick overview of the CD process, the different styles of CD on the market, what you need to get started, and a mini-dictionary.  There's a lot to learn about CDing but also - I hope - a lot to love!

Wednesday, July 7, 2010

Oh Baby

What is my newest family addition, if not another reason to shop??  There are so many fabulous things out there - even new goodies since I was in baby shoppin mode 3 years ago - that I have to watch myself.  No really.  In order to help me do that I've become very good friends with two websites that operate similarly but a little different from one another:

www.Babysteals.com:  Babysteals is a great website run by Utah mamas that offers great baby, child, and maternity items at very discounted prices (often around 1/2 off!).  Each day, at 10am central time, they list a new "steal".  (For instance today is GroBaby cloth diapering system for half off!)  You can sign up to get email notices of each deal (however I do note that a lot of times the emails don't go out until well after 10am and sometimes the bargains can be gone by then!! yes - we bargain shoppin mamas are not to be messed with)   I've done quite a bit of damage here - but to great ends.  I've been introduced to wonderful products (Aden & Anias muslin swaddling blankets - MUST have) and also gotten my hands on things I wouldn't have sprung for at full price (Ergo Organic embroidered carrier) all at a major cost savings.  On top of that shipping is always reasonable and quick!

www.Mamabargains.com:  Mamabargains is similar but operates a bit differently.  This site has great deals similar to those offered by Babysteals (great items at deep discounts) but they offer new items on a constant rotation.  In other words, they will offer a deal, and once it is gone, they quickly post up a new one.  So instead of one deal a day you have access to many!  It is tricky (and addictive) to keep checking in but its worth it!  I've just started following Mamabargains and already made my first purchase yesterday (Amon Maternity's  - Forgive Bodyshaper... not that I need it... ahem).  This site has multiple shipping options from First Class mail to overnight UPS.  You choose.

Happy mama shopping ... and as I tell my husband, these deals are so good the items are "practically free".  Feel free to steal that one.

Tuesday, June 29, 2010

Skinny Jeans For Not So Skinny People

One trend I haven't been able to get into - literally - is the Skinny Jean.   Not that I don't love the vibe, but trying to put tailored denim on a pear = not a good look.  If the hips fit, the legs would be too wide and look silly.  If the legs fit, well lets just say we all know that muffin tops should relegate themselves to a breakfast food only - they do not belong on 30-something women. 

All that changed when I found out about Hue's Skinny Jeanz from a friend.  You may know Hue as a hosiery company (great tights, etc) but they have hit the mark with these great leggings.  They are made to look like jeans, but are a stretchy legging.  The zipper and pockets on the front are faux but they do have real back pockets.  The best thing is that they fit ALL body types!  So now I can wear that skinny-jeans-with-huge-cowl-neck-sweater-and-boots look that I've been eyeing for fall and not feel either silly or in pain.  One hint - do order one size up if you're anywhere on the line between sizes.  My post preggo bod is currently between an 8-10 in pants size, and I got the large. I'm glad I did.  While they are leggings they don't stretch as much as your typical lycra leggings in order to keep that denim look and shape.

They come in blue and black (the black being more a really dark charcoal - much nicer than harsh black) and I've seen them floating around in white as well as some jewel tones!

Here are the full jeanz

And here are their capris

So go rock that look you've been craving even if your body isn't going to be rocking the runway anytime soon!

Thursday, June 24, 2010

Everyday Things I Heart

Ok so most of us can't spend a week's paycheck on products like Creme De La Mer every month.  In that vein I wanted to share some of my grocery- and drugstore finds that I love.  And also share a few I wanted to love - but didn't.

1)  Garnier Length and Strength shampoo/conditioner:  I have tried everything from Bumble & Bumble to Fekkai and in general been let down.  Out of sheer rebellious frustration (and to earn brownie points with hubbs) I bought this at the grocery store late last year.  While it says its for "hard to grow long" hair, mine was already longish - but also very tired and dull.  After using this for about four months, I went to my hair dresser.  She commented more than once on how healthy my hair was and even told me while styling that backcombing may not stay in my hair since it was soooo silky smooth!  I totally love this stuff and have re-purchased when my old bottles ran out instead of hunting for something "new" or "better".  That's a miracle!

2)  Oil of Olay Touch of Sun moisturizer:  I have skin that tans easily.  Which is wonderful if you tan.  But I don't. So that means instead I have these lovely jaundice-yellow undertones that make me look ill instead.  I looked and looked for a moisturizer that would add subtle color (NOT a facial self tanner) but one that was kind to my skin as well.  This is the one.  I have used it for over a year now and love it.  No orange color build up; absolutely no streaking or splotching, and it gives wonderful subtle color.  I put it on after washing my face, let it soak in all of a minute or so, and then apply makeup.  I've never had an issue and my skin is great as a result.

3)  Sally Hanson Airbrushed Legs:  I was turned onto this by a friend (thanks Sarah!) and love it.  For those of us that don't have time (or desire) to keep applying self tanner every few days this is a great one-off event  solution.  You spray it on your hands and then smear it all over your legs (i.e. you do not spray  it on your legs like an airbrushed tan).  It gives great coverage and color (not orange or streaky and nicely semi-opaque) but won't wear off on clothing or if caught in a light rain and doesn't look "painted".  You do have to use soap and a scrubbie to get it off in the shower - but I like that... that means it has staying power and won't wilt halfway through my day!

4)  Estee Lauder Perfectly Clean face cleanser:  Ok so not truly a grocery store find,  but not too expensive at $19 a tube and that tube will last FOREVER.  It takes only a pea-sized amount each time you cleanse and its amazing.  I use only water, cleanser and my hands when I wash my face - always have - and this stuff gets it all off.  Even my eye makup!  But at the same time its gentle and has a refreshing soft scent.  I doubt I'll ever use anything else as long as EL cooperates and keeps this one in rotation!

5)  Oil of Olay Quench lotion for Extra Dry Skin:  I have dry skin. Like really, really dry.  Like "I have never not had alligator legs during summer until I found this stuff" dry.  This lotion is the ONLY lotion I've ever used that will keep my skin soft and moisturized for the true 24 hours it claims.  Even more if on the weekends I skip a shower day (shhhhh).   Not much more to say other than fab...its the only lotion I'll use.  And that was reinforced by a momentary stray you'll read about below....


Things that were not so hot:

1)  Jergens Natural Glow Firming Lotion:  Ok for some reason I decided to stray from my lovely Quench in order to try and get some color on my legs.  I picked up this lotion one day at the store counting on it being as gradual and perfect as my Olay Touch of Sun facial moisturizer.  Plus it had a firming agent to battle cellulite!  Boy was this heaven! Wrong-o.  After one use I had streaks on my legs and splotching around my ankles and knees.  This has WAY too much self tanner in it and not enough of whatever else its supposed to do.  After a week I threw it out. There's nothing natural about it.

2)  Aquafresh Iso Active Lasting Impact toothpaste:  I have some weird obsession with trying new toothpastes.  Whatever catchy marketing or new bottle/tube comes along I have to give it a whirl.  I had been quasi-faithful to my Aquafresh Extreme Clean so I thought when this new "Iso Active" came out I'd give it a whirl.  Cool new "shaving cream-esque" can and it's made to go with my Sonicare toothbrush.  Perfect?  Not quite.  While the toothpaste tastes great and does turn into a neat "rabid dog" foam, my big beef..... it drools out tons of mess after every use!!  All down the can - and thus all over your counter (and hands!).  If you read the can it even suggests wiping down the nozzle after each use!  Who has the time or inclination??  Not me.  In addition, whatever it has in it, after using it for a week or so I noticed little strings of lip skin inside my mouth - as if the inside of my lips were peeling!  I stopped the paste, that stopped.  I started using it again, it was back.  That doesn't sound good to me.

That's all I've got for today kiddies!  I'll be back to review my Nordy's finds and some great baby items soon!

Wednesday, June 23, 2010

More to come....

Well my friends I have been busy at work obtaining blog fodder!   I have a package waiting at home for me from Nordy's full of goodies to tell you about.  I have yet another new pair of shoes to discuss (but see, these are athletic shoes, so really its hardly even a shoe purchase at all - more a necessity!) and some great baby finds to tell you about!

In the meantime I offer you a present for your patience!!  An invite to join Gilt Group.  If you haven't heard of it, its a "wait list" or "invite only" discount group that offers A-list designer items for deeeep discounts.  I'm talking names like Vera Wang, L.A.M.B, Roberto Cavalli, DVF, and on and on.  Sometimes they even offer adorable high end baby/children's clothes!   There are new deals at noon EST each day!

So, if you'd like in on the goodies, feel free to use me as an invite.  In the interest of full disclosure I think I do get something like a $20 store credit if I refer "so many" people, but that's not my focus. (Honest Abe!)  I'm more interested in sharing the love with all my readers!!

http://www.gilt.com/invite/kholzer

Friday, June 18, 2010

Final Shoe of the Week: Friday

Ok, so for all the flak I've been getting about skyscraper heels, and for my spending habits, I now present to you, my final shoe of the day:

Target's Xhiliration "Saniya" Black Patent Pointy Toe Flats:

Flat shoes, rubber flex-sole, and on CLEARANCE for $6.98.  So there!   I do love the rubber flex soles, but right now my heels are not loving the inevitable blisters that are headed their way.... bummer.

I also realized today that I am in one of my "head-to-toe" Target modes.  In honor of the Bulls-eye Boutique, and my loyalty thereto, here is the rest of my ensemble:

Merona Deep Wash Jeans with No Gap Waistband:


Mossimo Studded Black Racerback Tank:

With Mossimo's Black Layering Cardigan overtop:


And yes, even my underthings are Target-bought however I will spare you (and my mother's feelings) and just leave it at that.

So my week of shoes is at its end.  A little sad, yes, but at least I get to keep the spoils of my adventure and wear them again and again.  Ok some more than others.....  next on the review "to do" list?  Dr. Scholl's gel insert for heels.  Hey if that chick from What Not To Wear hawks them they have to be great right?  We'll see!!!